

Notify me Via :
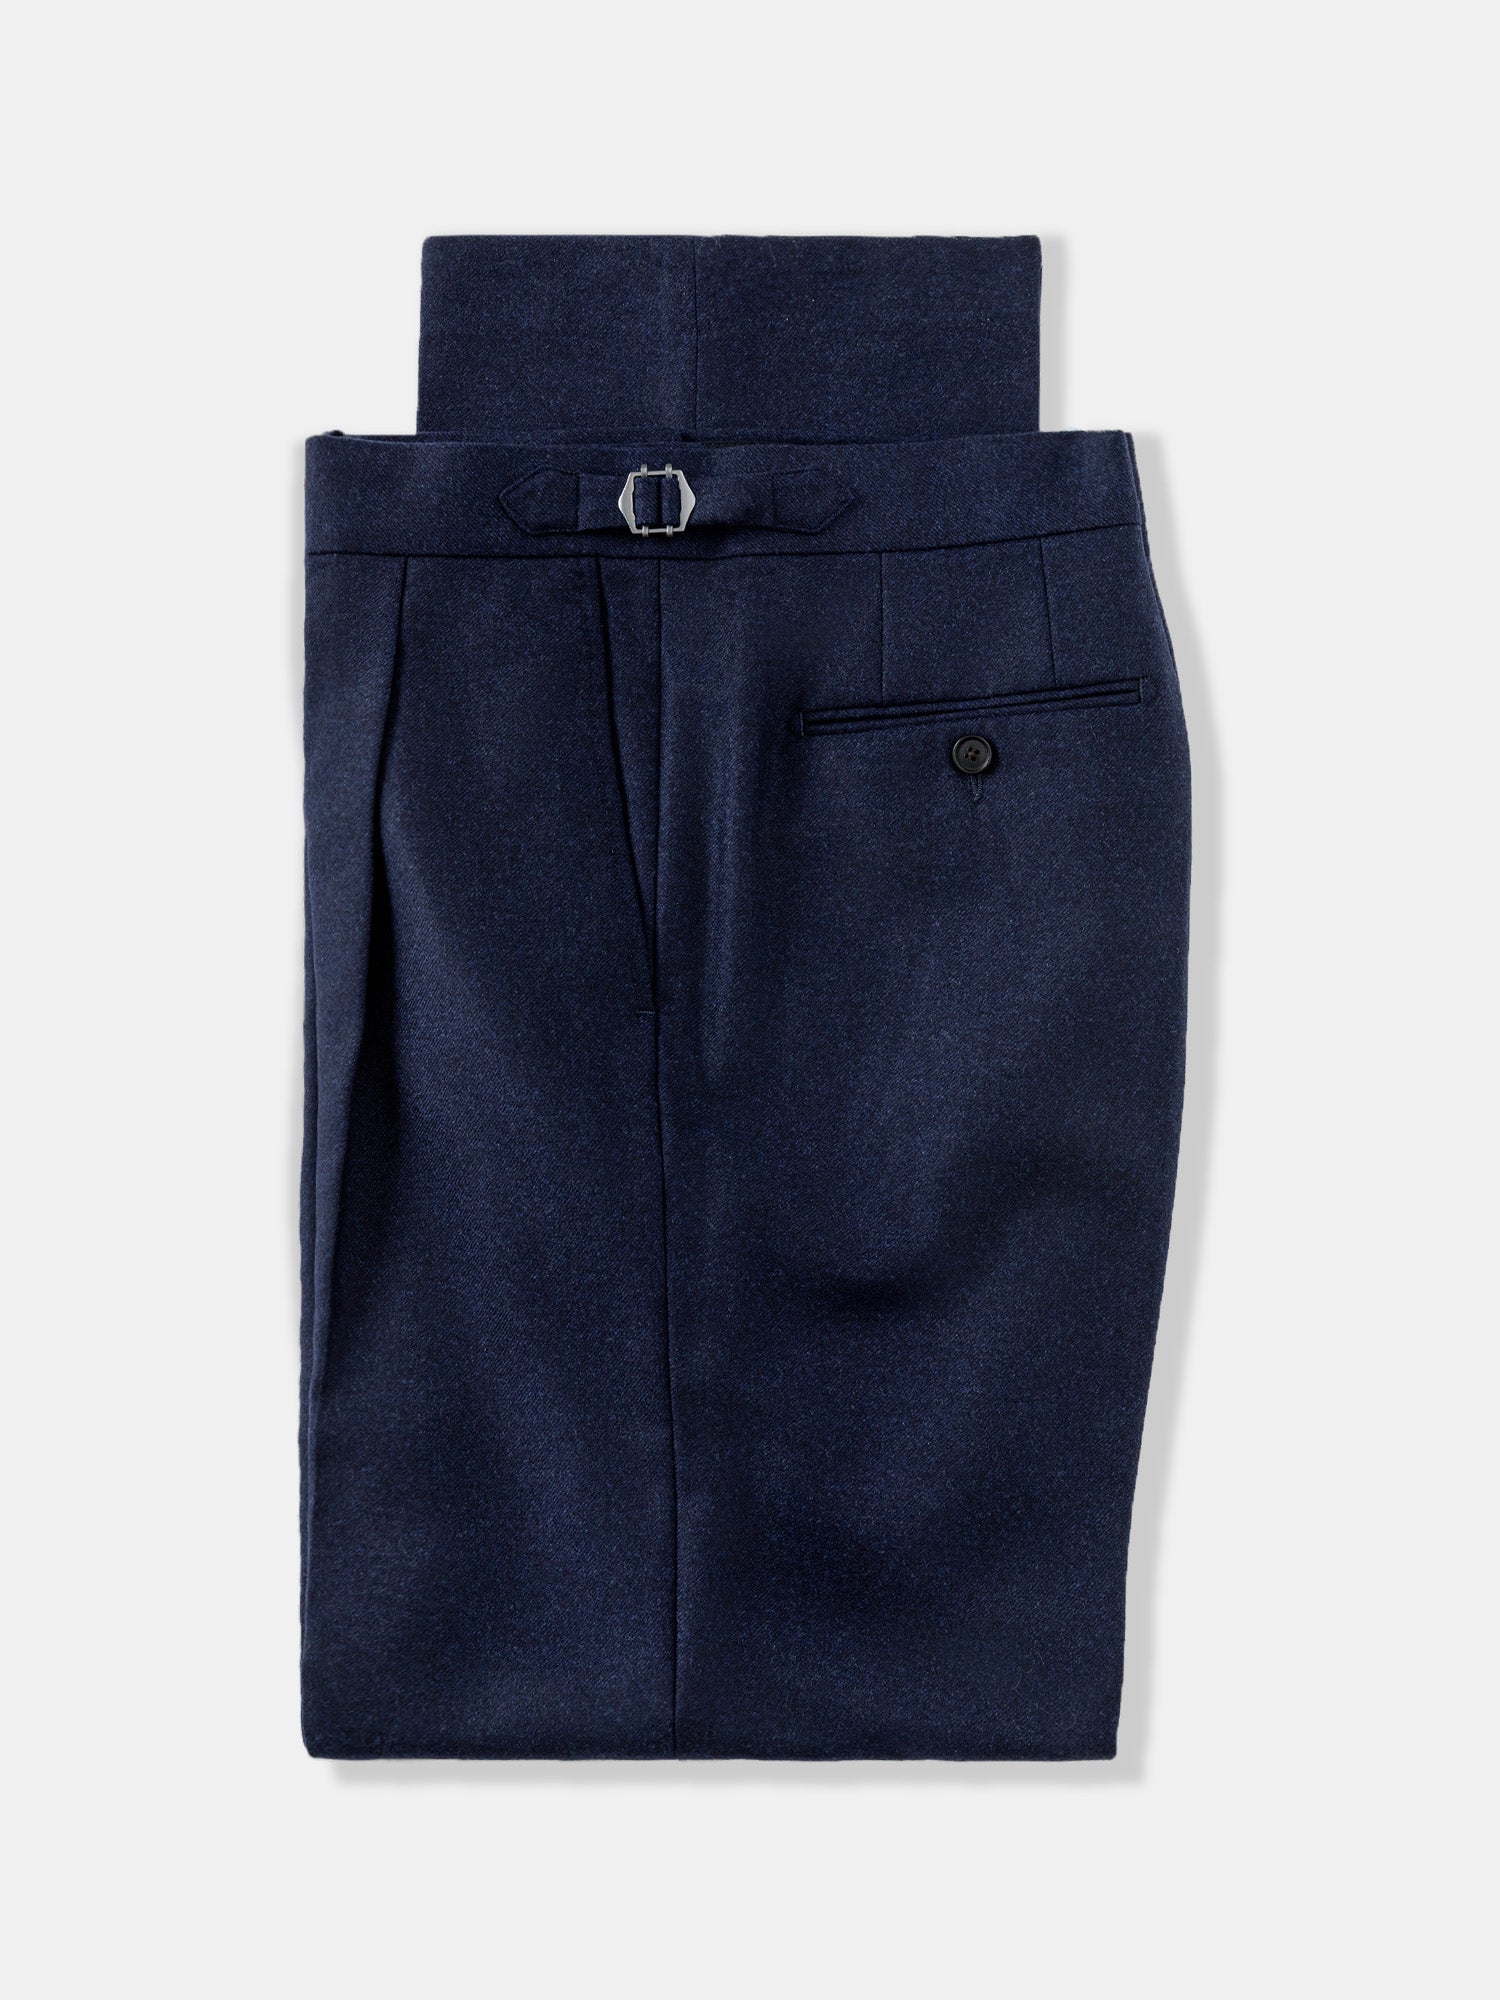
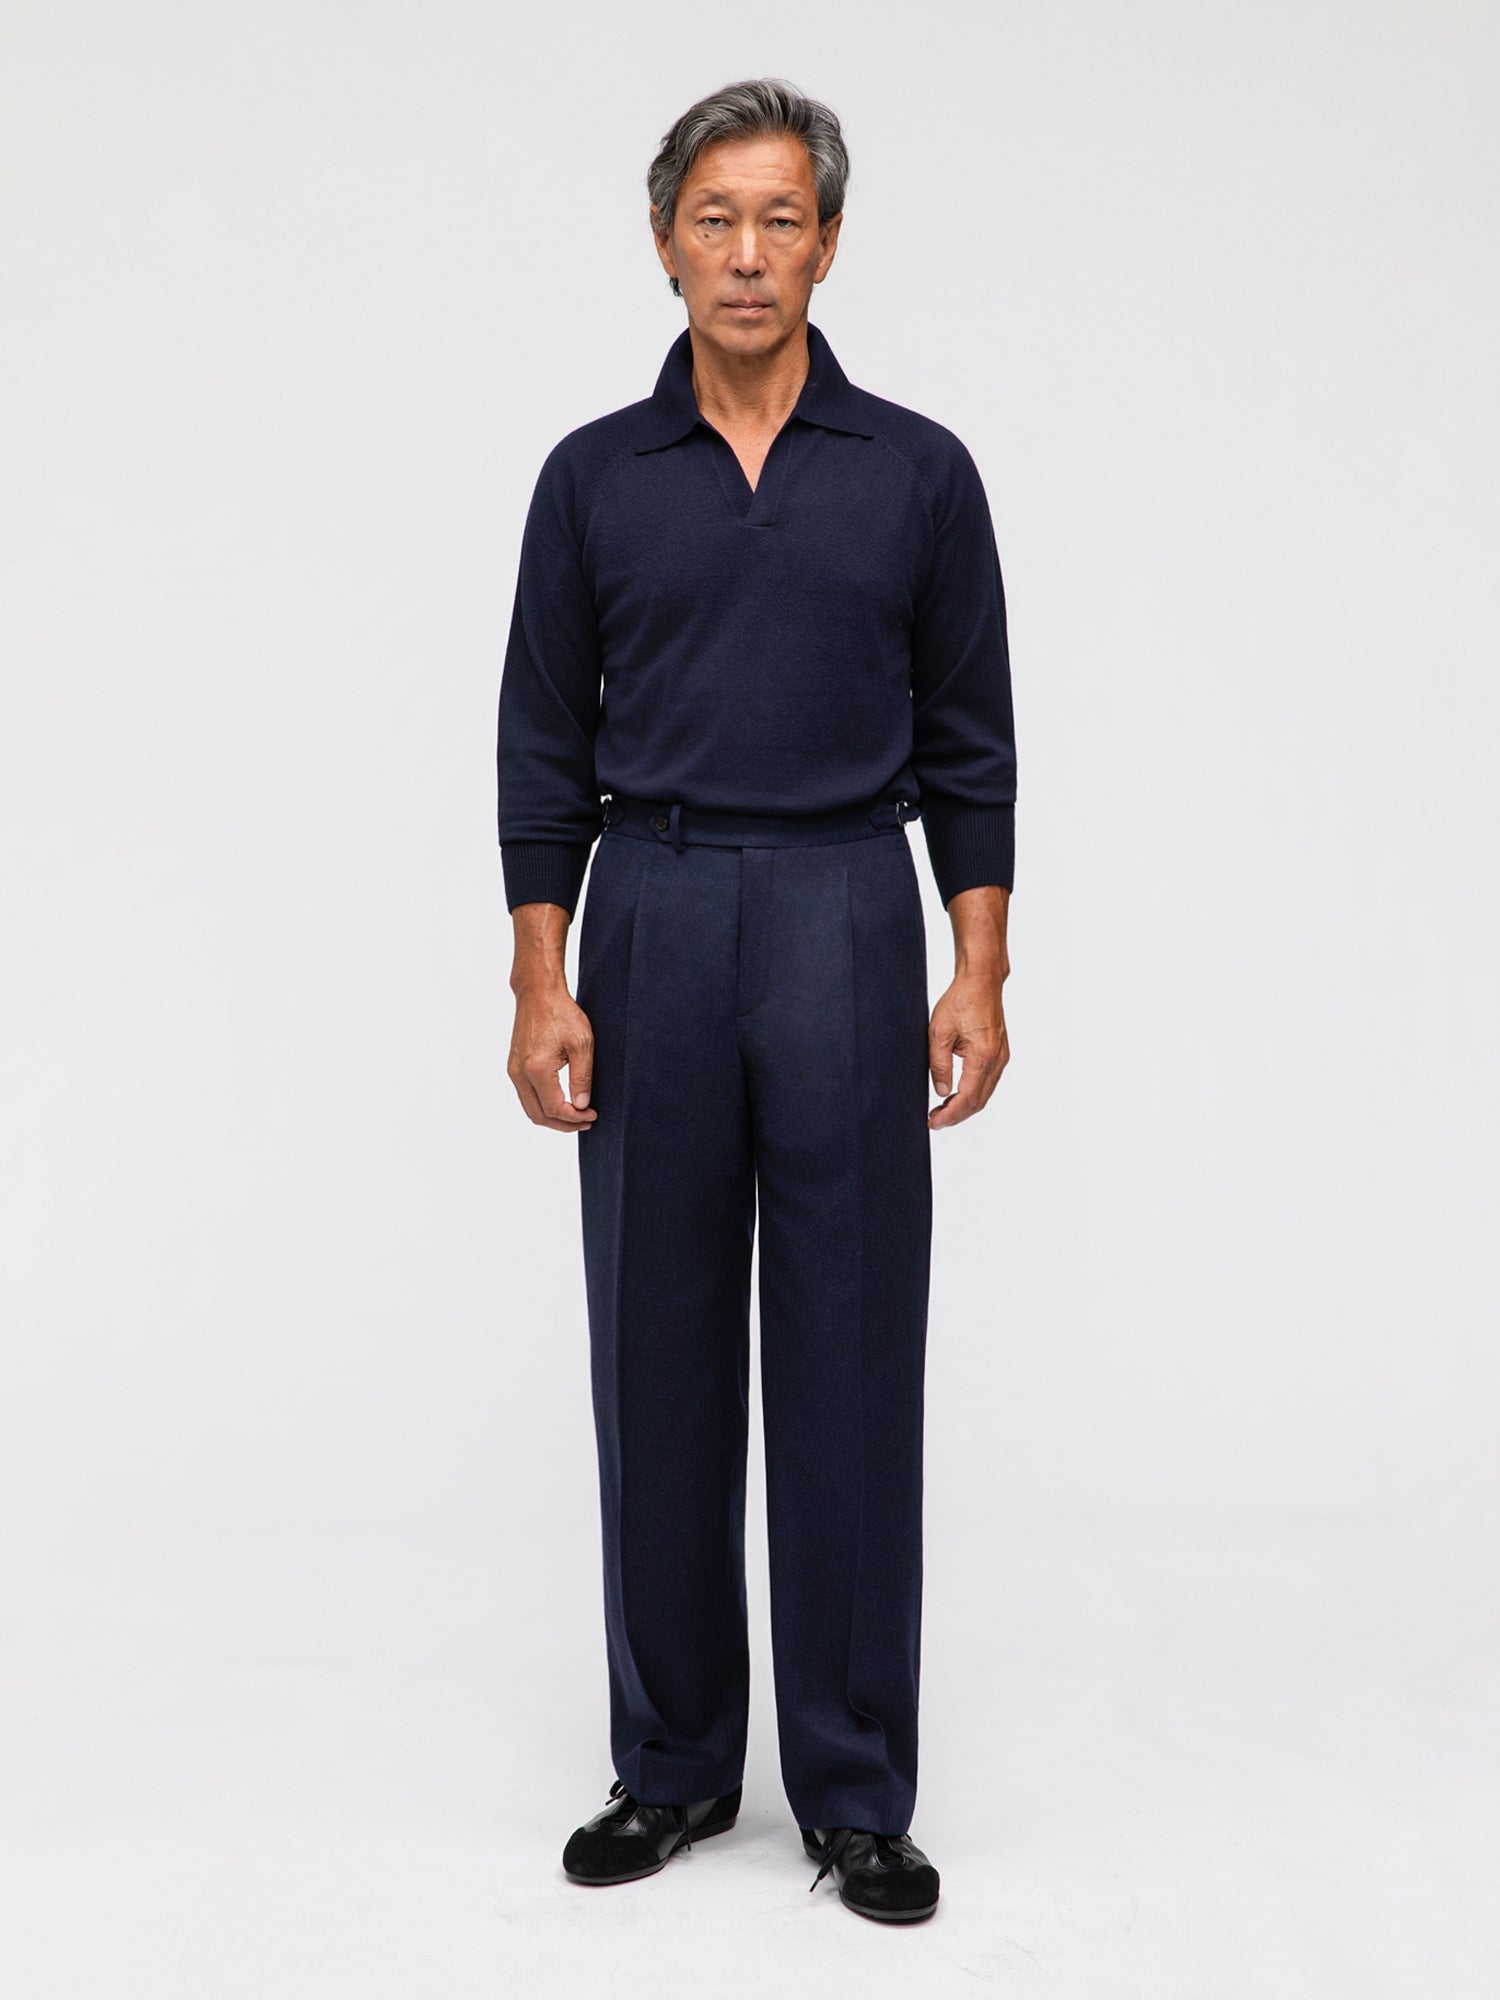
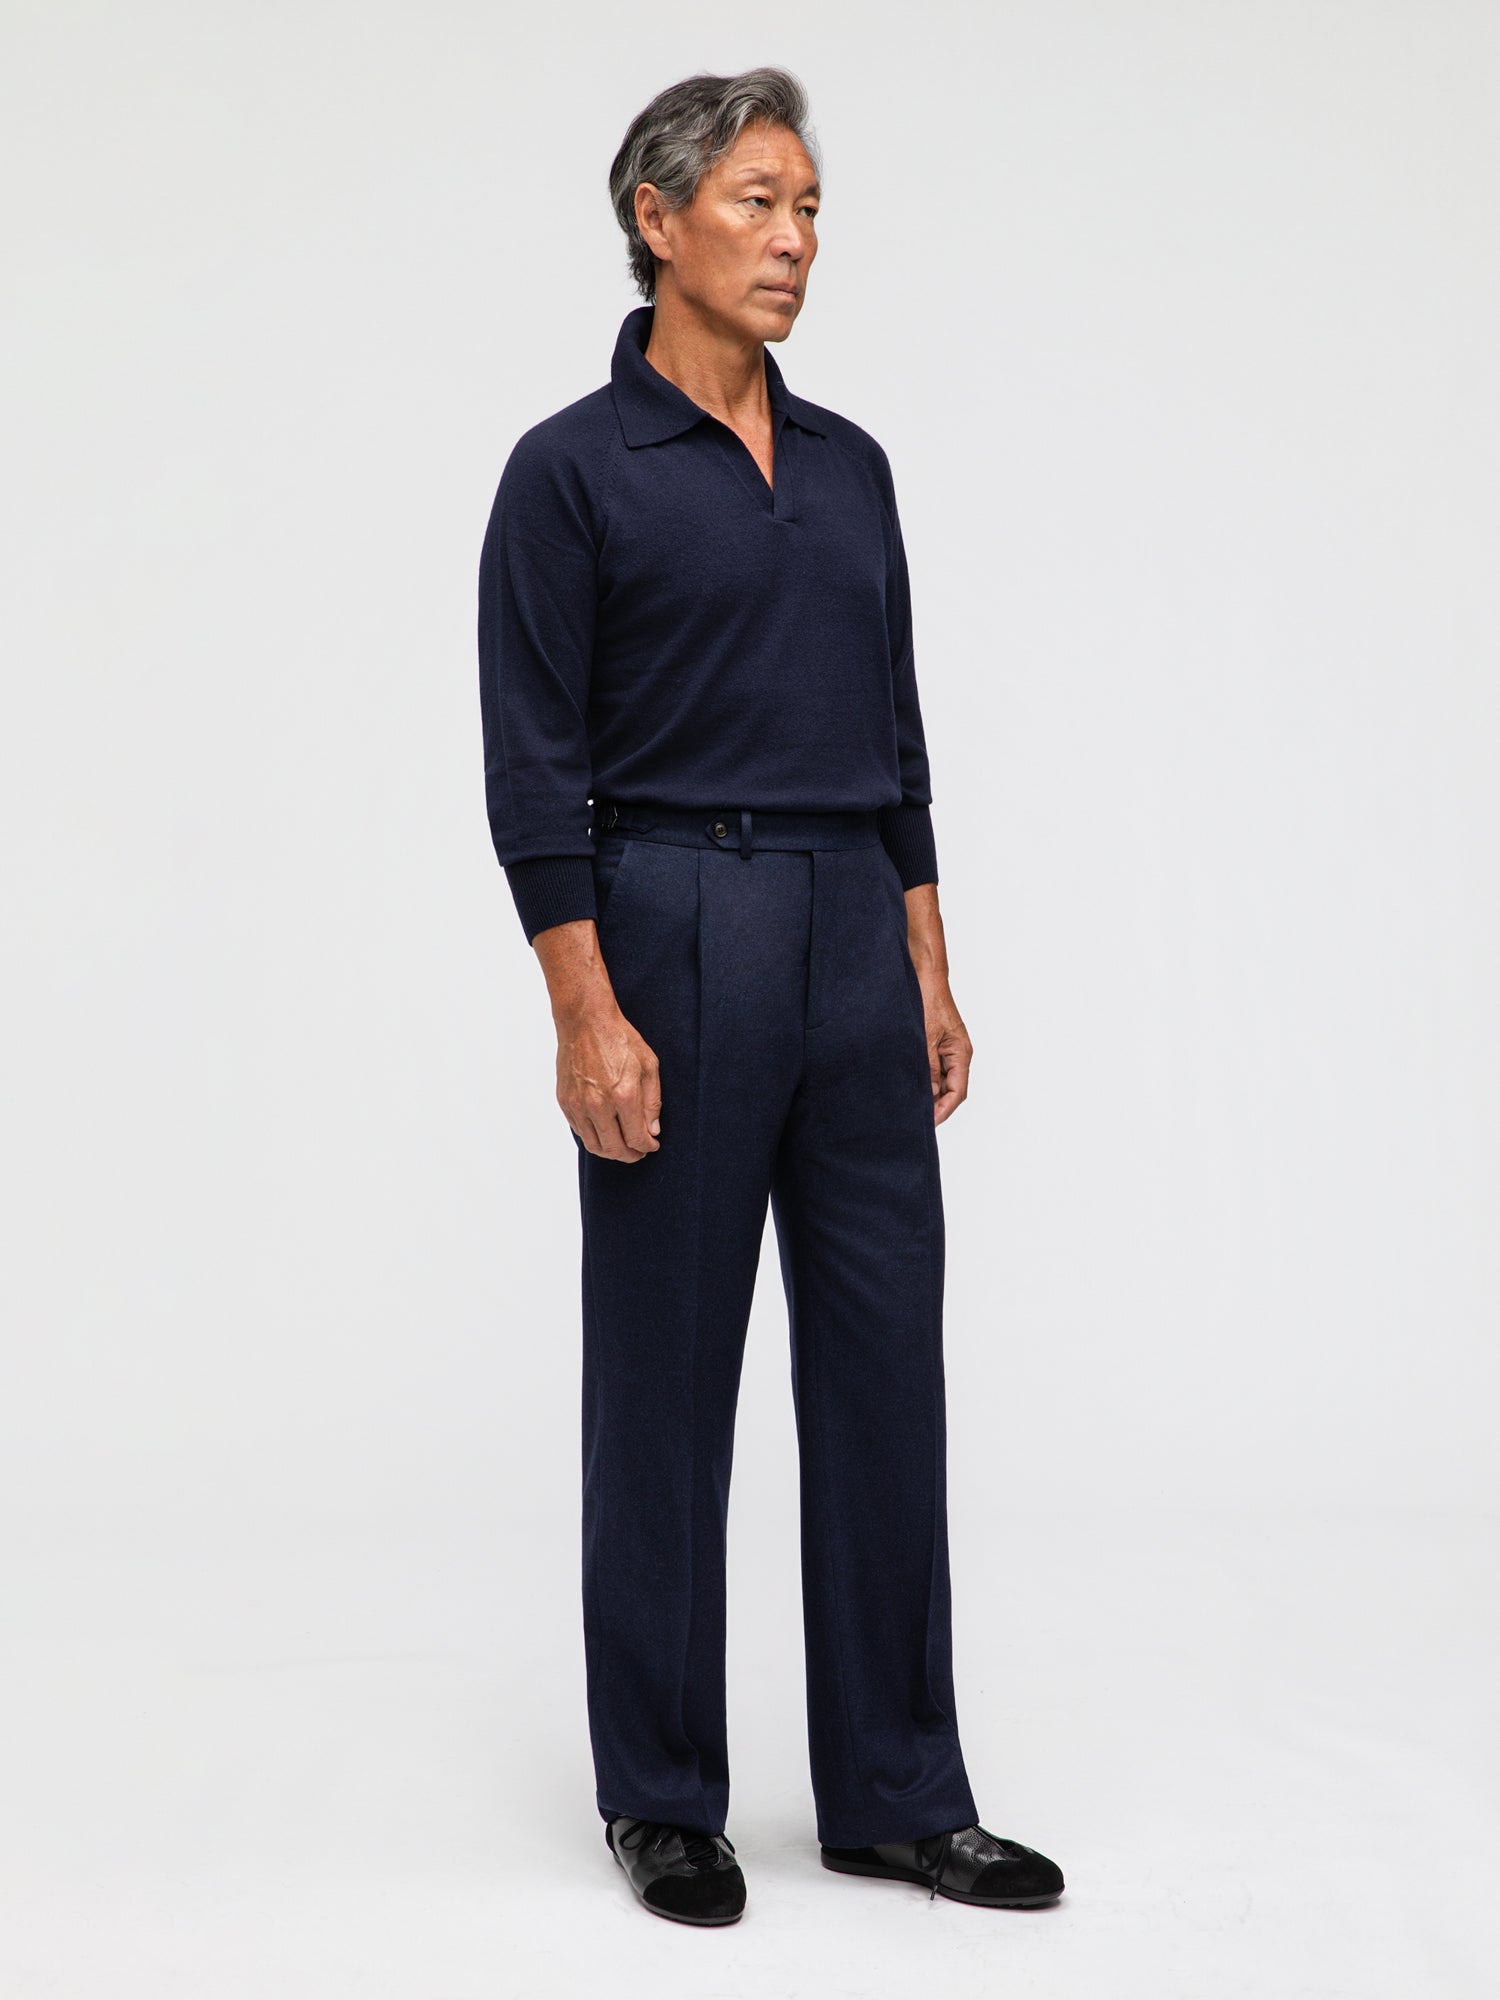
Navy Flannel Wool Trousers (Wide Fit)
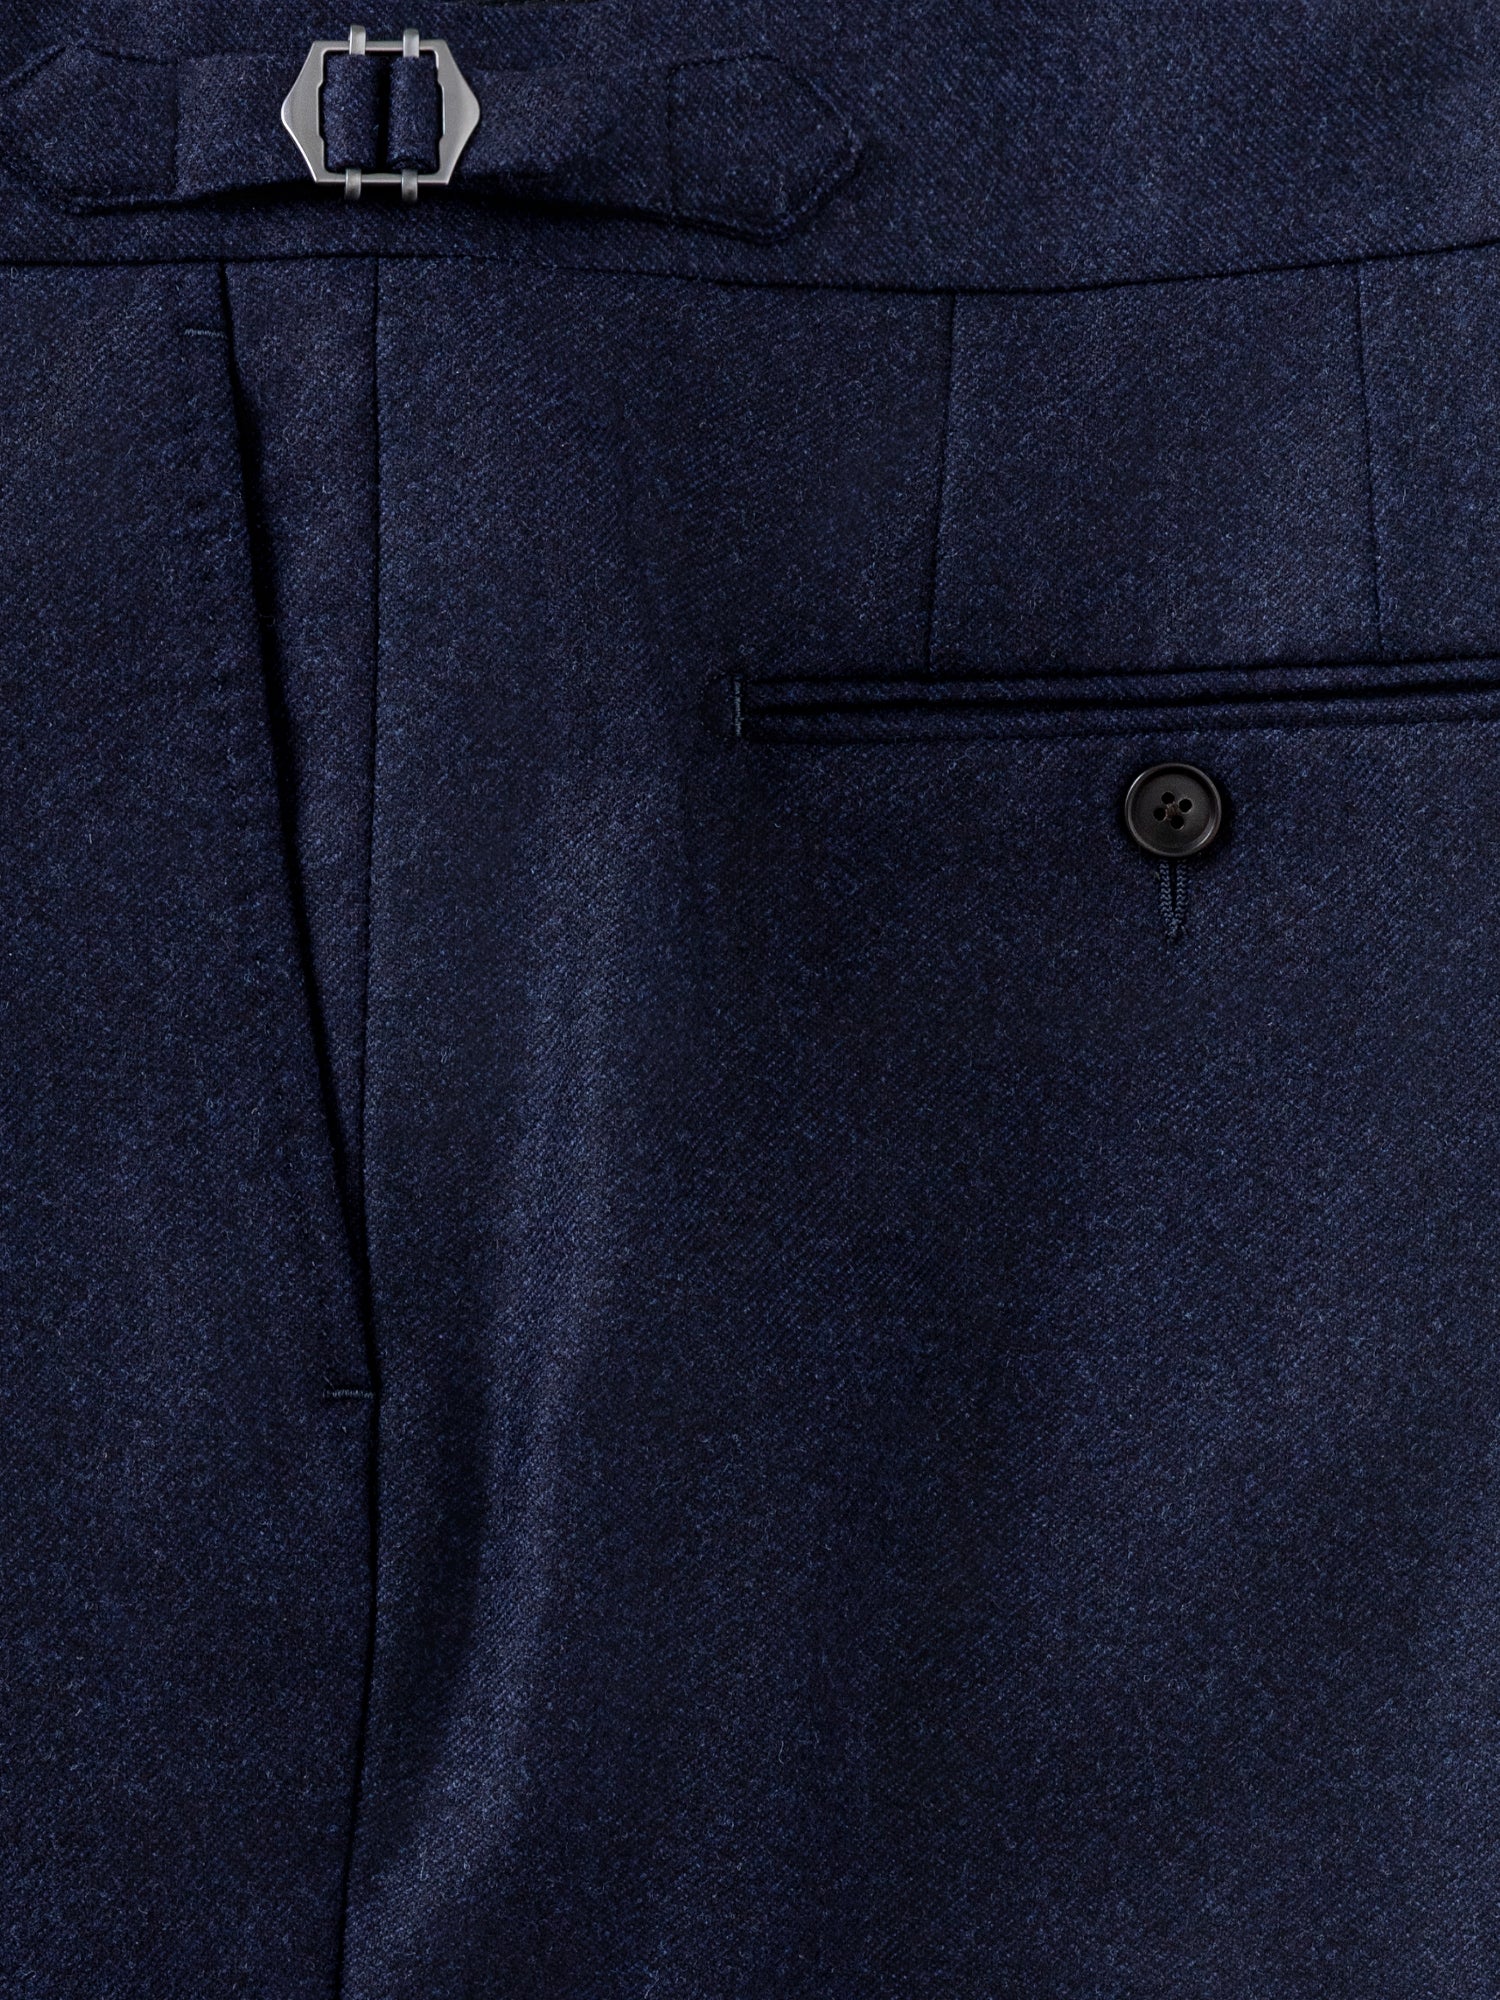
Navy Flannel Wool Trousers in a wide fit with a high waist and side adjusters. Pleated for a relaxed yet tailored silhouette. Made from a soft robust wool flannel.
Regular price
2,799.00 kr
2,799.00 kr

/ Size guide
Use the switch below to display measurements in centimeter or inches.
Have any further questions about fit? Book an appointment with one of our product specialists, and we'll be happy to help.
You can also write to us in the Chat.
Navy Flannel Wool Trousers in a wide fit with a high waist and side adjusters. Pleated for a relaxed yet tailored silhouette. Made from a soft robust wool flannel.
DETAILS & FEATURES
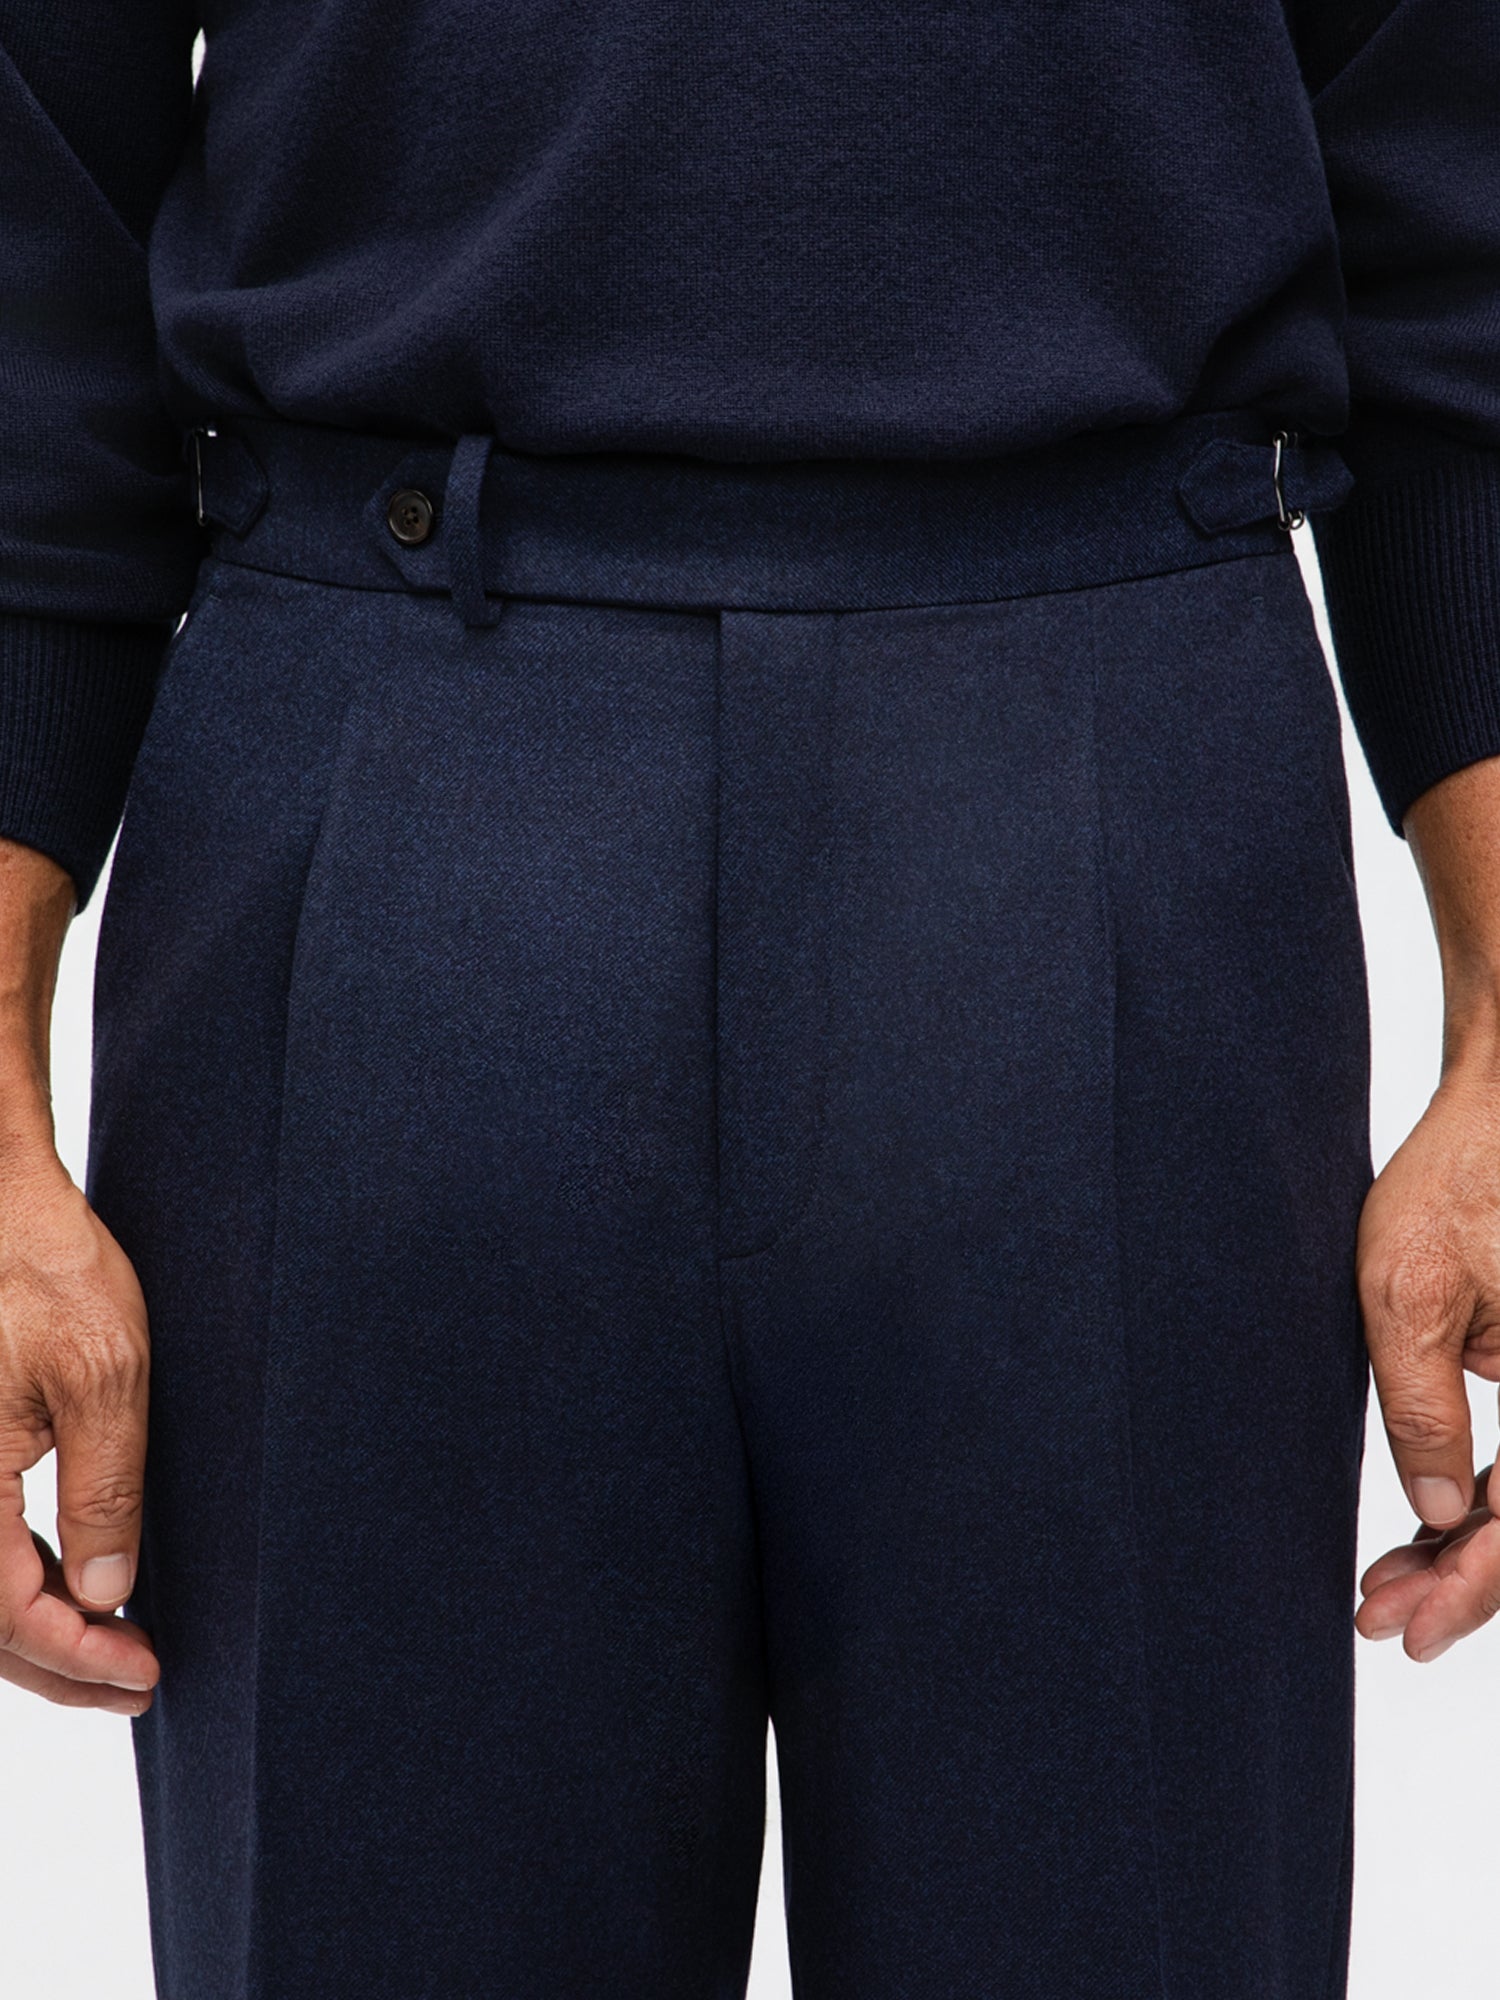
- — Trousers Peak with extended tab and one belt loop
- — Side-adjusters
- — Single Pleats (Outwards)
- — Half Lined
- — Plain hem
- — Back pockets jetted with buttons
FABRIC & MATERIALS
FABRIC: PURE WOOL FLANNEL
COMPOSITION: 100% WOOL
WEIGHT: 345 GRAM
COLOUR: NAVY
BUTTONS: HORN BUTTONS
SEASON: FALL / WINTER
CARE & WASHING
WASHING: DRY CLEAN ONLY
WASHING MACHINE: NO
IRONING: YES
STEAMING: YES
GENERAL GUIDE: STEAM AFTER EACH WEAR
DELIVERY TIME
Estimated delivery time: 3-5 days. To countries within the European Union, we ship with UPS or DHL. To the United States, Canada – and others – we ship with FedEx International. All shipments are fully trackable.
Please note: delivery times may vary depending on the delivery address. Custom made products are produced after you have placed your order, which means the delivery time is estimated between 3-5 weeks.
SIZING INSTRUCTIONS
Model is 5’ 9”7 / 182 cm, and is wearing a size 50 (EU)

DETAILS
- — Trousers peak extended
- — Single outward pleats
- — Side-adjusters
- — Wide fit
- — Half lined
- — Plain hem
FABRIC
This wool flannel is renowned for its exceptional quality and timeless appeal. Sourced from one of Italy's most prestigious mills, this fabric is known for its soft, warm texture and rich finish. Perfect for cooler weather, it offers a luxurious drape and durability, making it a favorite choice for refined suiting.
ORIGIN
Woven in Biella, Italy.
New to Custom Made? Press below to get started
GET STARTEDAlready have saved sizes? Log in below
LOGIN FOR SAVED SIZES
I HAVE TROUSERS THAT FIT ME WELL
Use measurements from a pair of trousers you already like.

I WANT TO START FROM SCRATCH
Enter your body measurements and select your fit preference.
LOGIN FOR SAVED SIZES
Login if you have an account with us where your measurements are stored from previous orders:
TROUSERS MEASUREMENTS
Select a trousers size that is your “Base size”, and then make adjustments by pressing plus or minus. Also, specify your fit preference.
BASE SIZE:

STEP 1:
Place the trousers flat on a table face up with the waistband buttoned. Smooth out any wrinkles or folds using your hands to ensure the fabric lies flat.

STEP 2:
Measure 1 cm / 0.5 inches down from the top edge of the waistband. This is where you will begin and end your waist measurement. Mark or note this point for accuracy.

STEP 3:
Starting from the marked point on the left edge of the waistband, measure along the top curve of the waistband. Be sure to follow the natural curve of the waistband the entire way. Multiply the number by two to get the full waist circumference.
IMPORTANT:
The waist measurement will vary slightly depending on where you prefer the trousers to sit. A high-waisted fit sits higher on the torso than a mid- or low-rise, which changes the point of measurement.

STEP 1:
Place the trousers flat on a table face up with the waistband buttoned. Smooth out any wrinkles or folds using your hands to ensure the fabric lies flat. Make the crotch seam visible.

STEP 2:
Start at the crotch seam — where the inseams intersect — and measure straight up to the waistband (waistband included).
IMPORTANT:
The waistband is included in the measurement.

STEP 1:
Place the trousers flat on a table face down with the waistband buttoned. Smooth out any wrinkles or folds using your hands to ensure the fabric lies flat. Make the crotch seam visible.

STEP 2:
Start at the crotch seam — where the inseams intersect — and measure straight up along the back seam to the waistband (waistband included).
IMPORTANT:
The waistband is included in the measurement.

STEP 1:
Place the trousers flat on a table face up with the waistband buttoned. Smooth out any wrinkles or folds using your hands to ensure the fabric lies flat.

STEP 2:
Measure from the bottom edge of the side pocket to the seam underneath the front fly — in a slight diagonal angle. Then measure from the seam underneath the front fly to the other side pocket edge. If the trousers have pleats, pull both sides so the pleats lay flat and open. This value will give you the half hip measurment. Double the amount to get the full hip measurment.

Make sure you measure from the at the edge of trousers, just below the pocket. The measurement should then pass the bottom of the zipper seam. Multiply the number by two to get the full hip circumference.
IMPORTANT:
Keep the measuring tape tight without any looseness.

STEP 1:
Place the trousers flat on a table face up with the waistband buttoned. Smooth out any wrinkles or folds using your hands to ensure the fabric lies flat.

STEP 2:
Locate the crotch seam — where the inseams meet. Measure 8 cm / 3 inches straight down from the crotch seam along the inseam.

STEP 3:
At that point, measure straight across the leg from edge to edge.
This gives you the half thigh measurement. Multiply the number by two to get the full thigh circumference.
IMPORTANT:
Make sure to keep measurement tape tight without any looseness.

STEP 1:
Lay the trousers flat on the side and smooth out any wrinkles. Lift one leg up.

STEP 2:
Locate the crotch seam — where the inseams meet. Measure 45 cm / 17.5 inches straight down from the crotch seam along the inseam.

STEP 3:
At that point, measure straight across the leg from edge to edge. This gives you the calf measurement — please note this is measured as a half measurement.
IMPORTANT:
Make sure to keep measurement tape tight without any looseness.

STEP 1:
Lay the trousers flat on the side and smooth out any wrinkles. Lift one leg up.

STEP 2:
Measure straight across the bottom edge of the trouser leg, from one side of the hem to the other. This gives you the leg opening — please note this is measured as a half measurement.
IMPORTANT:
Make sure to keep measurement tape tight without any looseness.

STEP 1:
Lay the trousers flat on the side and smooth out any wrinkles. Lift one leg up.

STEP 2:
Locate the crotch seam and measure straight down along the inner seam.

STEP 3:
Measure all the way down — if your trousers are cuffed, make sure to include the cuffs.
IMPORTANT:
The inseam determines if the trousers will have No Break, Half Break or Full Break. Please note that the inseam can be shortened later, but it cannot be lengthened. For body measurements: it is difficult to measure the inseam on the body, which is why we recommend measuring the inseam on a pair of trousers you already like in terms of length.
ADVANCED SIZE OPTIONS

If the trousers fit well through the seat and crotch but feel tight or are pulling at the back seam — causing discomfort or limiting movement — this alteration adds fabric to the crotch area. It reduces tension and allows for better mobility. Note: Small adjustments make a big difference.

If there’s extra fabric hanging below the seat — causing sagging or a loose fit in the crotch — this alteration removes fabric to clean up the shape and bring the trousers closer to the body. Note: Less is more — even minor changes improve the fit.

If the fit is good in this area, no alteration is needed.

Forward hips: The pelvis tilts forward, causing the back of the waistband to sit higher than the front. This posture often requires trousers to be cut with a higher back rise and lower front rise to follow the body’s natural angle and ensure the waistband stays level when worn.

Straight hips (most common): The waistband sits evenly on the body — level from front to back — which is typical for most individuals. This is the default cut used in standard trouser patterns.
SIZE PASSPORT NAME:
SELECT BASE TROUSERS SIZE
SHORT
(between 160 cm - 174 cm)REGULAR
(between 175 cm - 186 cm)LONG
(taller than 187 cm)-

TAPERED FIT
-

STRAIGHT FIT
-

WIDE FIT
-
EXTRA WIDE FIT


HOW TO MEASURE
BODY MEASUREMENTS
Enter your body measurements and fit preference. Our AI system will suggest garment measurements for you. You can make adjustments by pressing plus or minus.

Stand upright without shoes, back against a wall, with feet together and shoulders relaxed. Measure from the top of the head down to the floor. Use a flat object (like a book) to mark the top of the head, then measure vertically to the ground.
Keep the measuring tape straight.

Wrap the measuring tape around your waistline — where you would want the trousers to be positioned.

Our trousers are usually are high waisted, which means that the correct position to measure is 4 cm / 1.5 inches below the belly button.
Keep the measuring tape straight. The rise of the trousers affects the position to measure the waist.

Stand with feet together and wrap the measuring tape around the fullest part of the hips and seat. Keep the tape level and snug, without digging into the body. Make sure pockets are empty and you are standing upright.
Keep the measuring tape straight.

Wrap the tape around your upper thigh — slightly below the crotch (8 cm / 3.15 inches). Make sure the tape stays horizontal and flat against the leg. The leg should be relaxed.
Keep the measuring tape straight.

Measure around the widest point of the calf, usually at the midpoint between the knee and ankle. Keep the tape comfortably snug and level. The leg should be straight and relaxed while measuring.
Keep the measuring tape straight.
STEP 1:
Lay the trousers flat on the side and smooth out any wrinkles. Lift one leg up.
STEP 2:
Locate the crotch seam and measure straight down along the inner seam.
STEP 3:
Measure all the way down — if your trousers are cuffed, make sure to include the cuffs.
IMPORTANT:
The inseam determines if the trousers will have No Break, Half Break or Full Break. Please note that the inseam can be shortened later, but it cannot be lengthened. For body measurements: it is difficult to measure the inseam on the body, which is why we recommend measuring the inseam on a pair of trousers you already like in terms of length.
ADVANCED SIZE OPTIONS

Standard tilt: The waistband sits evenly on the body — level from front to back — which is typical for most individuals. This is the standard default cut for most trousers.

Forward tilt: If your pelvis tilts forward, the back of the waistband naturally sits higher than the front. This posture often requires trousers to be cut with a higher back rise and lower front rise to follow the body’s natural angle and ensure the waistband stays level when worn.
Keep the measuring tape straight.
RISE
-

The High Rise is characterized by a waistband that sits just below the belly button, creating a longer leg line and a more structured, tailored silhouette. Our standard rise for all of our Ready To Wear trousers are high rise — and we usually recommend this fit for most body types.

HIGH RISE
(RECOMMENDED) -

The Mid Rise is characterized by a waistband that sits slightly above the natural waist. If you don't like the idea of having high waisted trousers, we recommend opting for the mid rise fit.

MID RISE
-

The Low Rise is characterized by a waistband that sits on the hips. We normally only recommend the low rise fit if you want the trousers to sit below your belly if you have a rounder stomach.

LOW RISE


SHAPE
-

The Wide Fit is characterized by a straight cut that is overall more generous in width, giving the trousers a relaxed, slightly “flowy” appearance while maintaining structure.

WIDE FIT
-

The Straight Fit is characterized by an even line from thigh to calf to leg opeing, creating a clean, uninterrupted silhouette with uniform proportions throughout the leg.

STRAIGHT FIT
-

The Tapered Fit is characterized by a narrower leg opening compared to the thigh and knee, producing taper that follows the natural shape of the leg.

TAPERED FIT
-

The Extra Wide Fit is characterized by a bold width from thigh to calf to hem, resulting in a dramatic, statement-making wide silhouette throughout the entire leg.

EXTRA WIDE FIT


BASE SIZE:
STEP 1:
Place the trousers flat on a table face up with the waistband buttoned. Smooth out any wrinkles or folds using your hands to ensure the fabric lies flat.
STEP 2:
Measure 1 cm / 0.5 inches down from the top edge of the waistband. This is where you will begin and end your waist measurement. Mark or note this point for accuracy.
STEP 3:
Starting from the marked point on the left edge of the waistband, measure along the top curve of the waistband. Be sure to follow the natural curve of the waistband the entire way. Multiply the number by two to get the full waist circumference.
IMPORTANT:
The waist measurement will vary slightly depending on where you prefer the trousers to sit. A high-waisted fit sits higher on the torso than a mid- or low-rise, which changes the point of measurement.
STEP 1:
Place the trousers flat on a table face up with the waistband buttoned. Smooth out any wrinkles or folds using your hands to ensure the fabric lies flat. Make the crotch seam visible.
STEP 2:
Start at the crotch seam — where the inseams intersect — and measure straight up to the waistband (waistband included).
IMPORTANT:
The waistband is included in the measurement.
STEP 1:
Place the trousers flat on a table face down with the waistband buttoned. Smooth out any wrinkles or folds using your hands to ensure the fabric lies flat. Make the crotch seam visible.
STEP 2:
Start at the crotch seam — where the inseams intersect — and measure straight up along the back seam to the waistband (waistband included).
IMPORTANT:
The waistband is included in the measurement.
STEP 1:
Place the trousers flat on a table face up with the waistband buttoned. Smooth out any wrinkles or folds using your hands to ensure the fabric lies flat.
STEP 2:
Measure from the bottom edge of the side pocket to the seam underneath the front fly — in a slight diagonal angle. Then measure from the seam underneath the front fly to the other side pocket edge. If the trousers have pleats, pull both sides so the pleats lay flat and open. This value will give you the half hip measurment. Double the amount to get the full hip measurment.
Make sure you measure from the at the edge of trousers, just below the pocket. The measurement should then pass the bottom of the zipper seam. Multiply the number by two to get the full hip circumference.
IMPORTANT:
Keep the measuring tape tight without any looseness.
STEP 1:
Place the trousers flat on a table face up with the waistband buttoned. Smooth out any wrinkles or folds using your hands to ensure the fabric lies flat.
STEP 2:
Locate the crotch seam — where the inseams meet. Measure 8 cm / 3 inches straight down from the crotch seam along the inseam.
STEP 3:
At that point, measure straight across the leg from edge to edge.
This gives you the half thigh measurement. Multiply the number by two to get the full thigh circumference.
IMPORTANT:
Make sure to keep measurement tape tight without any looseness.
STEP 1:
Lay the trousers flat on the side and smooth out any wrinkles. Lift one leg up.
STEP 2:
Locate the crotch seam — where the inseams meet. Measure 45 cm / 17.5 inches straight down from the crotch seam along the inseam.
STEP 3:
At that point, measure straight across the leg from edge to edge. This gives you the calf measurement — please note this is measured as a half measurement.
IMPORTANT:
Make sure to keep measurement tape tight without any looseness.
STEP 1:
Lay the trousers flat on the side and smooth out any wrinkles. Lift one leg up.
STEP 2:
Measure straight across the bottom edge of the trouser leg, from one side of the hem to the other. This gives you the leg opening — please note this is measured as a half measurement.
IMPORTANT:
Make sure to keep measurement tape tight without any looseness.
STEP 1:
Lay the trousers flat on the side and smooth out any wrinkles. Lift one leg up.
STEP 2:
Locate the crotch seam and measure straight down along the inner seam.
STEP 3:
Measure all the way down — if your trousers are cuffed, make sure to include the cuffs.
IMPORTANT:
The inseam determines if the trousers will have No Break, Half Break or Full Break. Please note that the inseam can be shortened later, but it cannot be lengthened. For body measurements: it is difficult to measure the inseam on the body, which is why we recommend measuring the inseam on a pair of trousers you already like in terms of length.
ADVANCED SIZE OPTIONS
If the trousers fit well through the seat and crotch but feel tight or are pulling at the back seam — causing discomfort or limiting movement — this alteration adds fabric to the crotch area. It reduces tension and allows for better mobility. Note: Small adjustments make a big difference.
If there’s extra fabric hanging below the seat — causing sagging or a loose fit in the crotch — this alteration removes fabric to clean up the shape and bring the trousers closer to the body. Note: Less is more — even minor changes improve the fit.
If the fit is good in this area, no alteration is needed.
Forward hips: The pelvis tilts forward, causing the back of the waistband to sit higher than the front. This posture often requires trousers to be cut with a higher back rise and lower front rise to follow the body’s natural angle and ensure the waistband stays level when worn.
Straight hips (most common): The waistband sits evenly on the body — level from front to back — which is typical for most individuals. This is the default cut used in standard trouser patterns.
